Replacing Galvanized Pipes in your home can feel daunting. However, understanding the process can empower homeowners. Many homes built decades ago used galvanized pipes. Over time, these pipes corrode, leading to leaks and water quality issues.
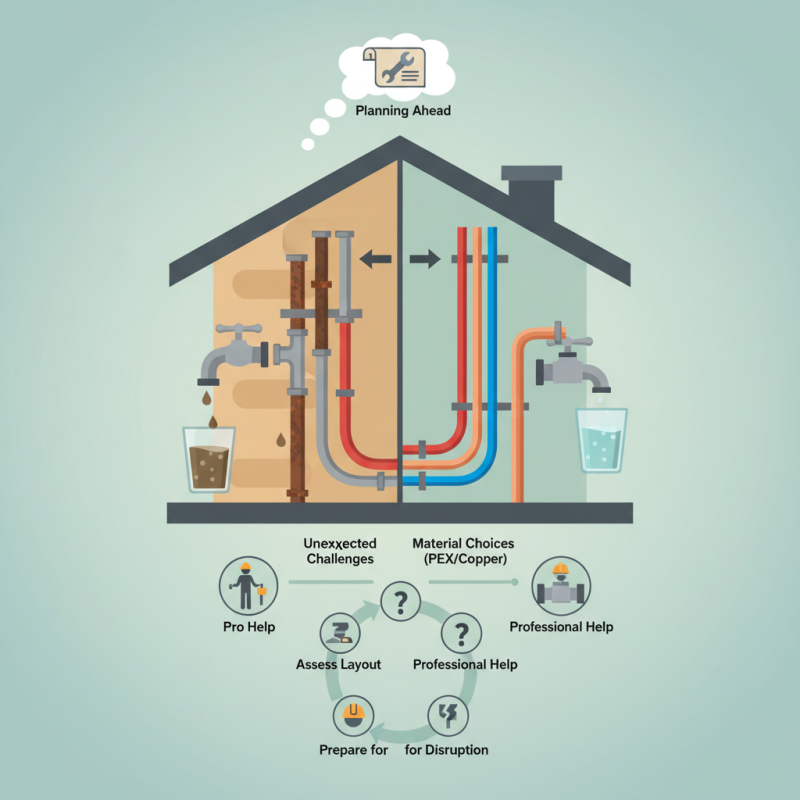
When replacing galvanized pipes, it’s essential to consider material choices. Options like PEX or copper can offer durability and longevity. Many homeowners overlook the importance of professional help. An experienced plumber can diagnose issues accurately and provide effective solutions. Not every project will go smoothly. There can be unexpected challenges during installation.
Make sure to prepare for the process ahead. Assessing your home’s plumbing layout is crucial. Consider the location of walls, fixtures, and the main water line. Planning ahead can save time and frustration. Be aware that replacing galvanized pipes may involve disruptions. Clear pathways and communicate with family members about the work being done. Understanding these details enhances the overall experience.
Galvanized pipes were once popular for home plumbing systems. Made from steel coated with zinc, they are resistant to corrosion initially. However, over time, they can lead to some significant issues. The zinc coating wears off, causing rust and leaks. This deterioration may impact water quality, leading to health concerns.
Many homeowners may not realize the limitations of these pipes until problems arise. Signs of corrosion may include discolored water or reduced water pressure. Replacing galvanized pipes can be messy and requires planning. It is essential to weigh the pros and cons before undertaking the project.
Professional advice can be beneficial. Consult with experienced plumbers to explore options, such as PVC, copper, or PEX replacements. Understanding the inherent issues with galvanized pipes helps homeowners make informed decisions. Each option comes with its benefits and potential drawbacks. Reflect on your plumbing needs seriously.
| Pipe Type | Material | Lifespan (Years) | Cost Estimate ($/ft) | Advantages | Disadvantages |
|---|---|---|---|---|---|
| Galvanized Steel | Steel coated with zinc | 40-50 | $5 - $10 | Good corrosion resistance | Prone to rust and mineral buildup |
| PVC | Polyvinyl chloride | 50-100 | $0.50 - $3 | Lightweight and easy to install | Not suitable for hot water |
| Copper | Copper metal | 70-100 | $2 - $8 | Durable and resistant to corrosion | Expensive and can have installation challenges |
| PEX | Cross-linked polyethylene | 25-40 | $0.50 - $2 | Flexible and resistant to scale | Not suitable for outside use due to UV sensitivity |
Assessing the Condition of Existing Galvanized Plumbing
Understanding the condition of your galvanized pipes is critical before replacing them. Begin by inspecting for rust or discoloration. Rust can compromise water quality and lead to leaks. Additionally, check for leaks, which often manifest as damp spots or water pooling. These signs may indicate that pipes need urgent replacement.
Tips: Look for signs like a metallic taste in water. This could signal corrosion in your pipes. Small leaks can escalate quickly, so address them as they appear.
Age is another important factor. Typically, galvanized pipes have a lifespan of 40 to 50 years. If your home was built during that period, a more thorough inspection is necessary. Consider using a pipe camera to see the interior clearly. This technology can reveal hidden problems you might miss otherwise.
Tips: Don’t hesitate to invite a professional for a second opinion. Their expertise can help you understand the potential risks involved. Sometimes, what looks good on the surface may hide significant issues within.
When replacing galvanized pipes, choosing the right materials is crucial. Copper, PEX, and CPVC are popular alternatives. Each has its pros and cons. Copper offers durability and longevity. However, it can be pricey. PEX is flexible and easy to install but may not withstand extreme heat as well. CPVC is inexpensive and resistant to corrosion, yet it can become brittle over time.
Tips: Always assess the specific needs of your home. Your climate, water quality, and local codes affect material choice. Seek advice from plumbing experts. Their experience can guide you towards the best option.
Consider factors like installation costs and maintenance. Each material has a different lifespan, impacting your long-term expenses. Be wary of quick fixes; they can lead to bigger issues later. A thoughtful approach will ensure a reliable plumbing system.
Replacing old galvanized pipes is an essential step for maintaining a healthy home plumbing system. Studies indicate that 50% of homes built before the 1960s still have these pipes, which can lead to rust and water contamination. When considering a replacement, it is crucial to follow a step-by-step process to ensure a safe and effective removal.
Begin by shutting off the water supply. This prevents leaks and flooding during the process. Carefully drain existing water from the pipes by opening faucets. Using adjustable wrenches, remove old fittings and sections of the pipe. It’s often challenging to loosen rusted joints, requiring patience and resilience. Be prepared for potential frustrations as you navigate unexpected leaks or stubborn connections.
Once the pipes are removed, inspect the surrounding areas for damage. This is a vital step that is often overlooked. A recent Home Improvement Report noted that 30% of homeowners face hidden issues during pipe replacement. Addressing these now can save on costly repairs later. After ensuring the area is sound, you can then safely install new piping materials, which can include PEX or copper, offering lasting durability and compliance with current plumbing standards.
When installing new piping, attention to detail is crucial. Start by selecting the correct materials for your home. Consider using copper or PEX, which are durable and less prone to corrosion. Measuring the lengths of piping accurately is critical. Ensure you have adequate tools like pipe cutters and wrenches. Measure twice, cut once. Miscalculations can lead to wasted materials and extra work.
Prepare your workspace properly. Clear any obstructions to facilitate movement. Secure the area to avoid hazards. When connecting pipes, make sure joints are tight. Use appropriate sealants or connectors to prevent leaks. Check for leaks after installation. A small drip can turn into a big issue. Revise your techniques continuously, learning from mistakes made during the process.
Don’t forget about venting and drainage. Proper layout is vital for the system’s efficiency. Balancing pipes can be tricky, especially in older homes. Be open to adjusting your plan as needed. Experience brings insights that books may not cover. The satisfaction of a job well done is worth the effort put into learning and improving.
Please fill in as much details as possible and we will take care of your request as soon as possible